Tuesday, 22 December 2009

What I have been doing in December

I have now finished all but one of my Xmas projects, so I can present them for your delectation, if anyone actually reads this thing!

First up are the little Chrimbo Ornaments for the Perfumed Waters Ornament Swap.


These are three completed little silk velvet trees, two outlined in gold smooth passing, with "jewels" from Walthamstow market as ornaments. One has bright check purl as tinsel, the other has Purl purl, one has an embroidered trunk with split stitch for "bark" and the other is beads. they are hand sewn up over card padded with 1/4 inch polyester batting, and inside the two smaller ones i popped a scrap of silk soaked in BPAL "Midnight Mass" perfume because it smells Christmassy to me. The bigger one I used Gilt Rococo for the outline, and couched down sequin trim for the garland, and lovely holographic sequins for the baubles. He's my favourite and I'm keeping him, though I don't think a tree will happen at my house this year (all out of spoons).

Then there are the ornaments for the Avebury Yule Feast Secret Santa. A little heart and a reindeer from Andre Zuill's charming free designs. I have done a fair number of these for the festive period and I adore them. I can't draw, so finding charming free embroidery designs is such a boon!


The heart is outlined in stem stitch and buttonhole, and embellished with goldwork, beading and a tiny bit of satin stitch. I used Mulberry Silk Medium, and the fabric was some silk duchesse satin left over from Allison's fifties frock.

The Reindeer is done in my handweavers studio silks, and embellished with beads. I don't have a finished pic of him for some reason, so here he is cut out and ready to be made up. I made little lavender bags from lavender from the garden and popped them inside alongside foam board shapes and lots of batting, so they can be used on coathangers to freshen wardrobes when Xmas is over.

Finally there is a little owl for my beloved's mum.


I made him up into a spectacle case. He is all done in Mulberry Silks, on tan silk dupion (left over from my 18th century petticoat). I put some cotton poplin underneath to stabilise him, as the fabric is quite light. He is embellished with beads and goldwork, and I used split stitch for the feathers, as to me it looks feathery. I call him the little Peachy Wol, because he is not brown, or even tawny, he's peachy, and he's clearly a Wol, rather than an Owl! I like the gold spangles for his eyes. I sewed one on back to front, so he is slightly cross eyed, but I really like him that way, so I left it like that. The larger owl I am doing for my friend Tash, who hosted a most splendid yule feast is equally an Owl, not a Wol, and will not be cross eyed.

Wednesday, 2 December 2009

Chrimbo Trees, Chrimbo Trees, Chrimbo all the way!


I thought I would have a crack at making Christmas ornaments for the Perfumed Waters Swap, and some for my tree, and for mum in law's tree, and a few little pressies.

I like small fast projects that can be done in a few days.

These little Chrimbo trees are done on silk velvet in Goldwork embellished with crystals and sequins from the Fabulous Trim shop in Walthamstow Market. I used free colouring in book pages for the designs.

I like the way the bright check purl on the one on the left looks like tinsel!

I also do like the way they all look together, though they will be cut up, and stuffed and turned into individual ornaments.

Maybe next year I will make a more sophisticated Plaque, using posher crystals and more gold, and leave them all together. But this year I have too many bits and pieces planned for different people.

Saturday, 28 November 2009

Embroidered Reticule 18th Century design

I finally finished the reticule I was making from the 18th Century silk shading and goldwork design, and I am very pleased with how it turned out!


The original design was taken from Gail Marsh's 18th Century Embroidery Techniques.

I used 2% gold and gilt threads from Mace and Nairn, and LOTS of Paillettes (18th Century for tiny gold plated sequins). I love Paillettes. They are so much classier than sequins!

I also used my lovely Handweavers Studio silks. The fabric was some silk twill I got from Ebay for a quid a metre. I have 36 metres of the stuff, and I use it for all sorts of things. I backed it with white linen to embroider it whech gives it some substance. When making up the bag I flatlined it with cotton drill to help it keep its onion shape. The bag lining is the same gold dupion as the piping.

To make up the bag I followed these excellent instructions.

I looked all over the web for the purse frame, I love the peacocks! I think it came from U handbag too,
but they don't have it any more.

And because it was for Queenortart, there HAD to be piping. I don't quite have her touch with piping, but she liked it anyway.

She chose the onion shape, and I believe it works well with the design.

There was much squee when I presented it to her at consequences.

And it was so simple to make that I beleive more purses and bags may be in my future. In fact I'm considering using the little bird design I posted last to make a spectacle case for the mother in law for xmas.

Belle Epoque Ball Gown


Okay, I have finished the Frock of Doom. I started wanting to do something loosely based on a dress which Florence Farr, my character for the 1897 game wore in an extant picture.

I used the Truly Victorian Belle Epoque Evening Bodice and Grand Parlour skirt patterns, and made them up preety much exactly as per instructions, just adding a black chifforn overlayer to the sleeves.

However, I did not get it finished for that game, so I wore one of my Artistic Reform Teagowns to the Ball, which actually worked much better for the character.

So there it sat, needing hemming, pressing, buttons, buttonholes and final Jhooshing for nearly two years.

At this year's Consequences (freeform gaming convention) there was a big Victorian game on the Satruday night so I sent my casting form in with the picture of Florence and a request to "just cast the frock!"

And I got Princess Alexandra. I had to buy myself a Tiara!

The hem took ages, it's about 8 yards around! And I hate the buttonholer on my machine, so I did all the buttonholes by hand. I like the way they look.

And I LOVE the little Swarowski Crystal buttons up the back.

I changed my idea for the lace. I was going to use a deep vintage chantilly, but when I compared the laces I had, it looked a bit too lingerie (perfect for an actress, not regal enough for Princess Alex, and the narrower modern machine embroidered lace with cream on black was just perfection.

Anyway, here be pics!


Friday, 13 November 2009

Small, but Shiny!

This year I am trying to embroider things for Xmas starting with the Perfumedwaters Xmas ornament swap.

I was a bit stuck for inspiration for this one, as designs need to be small, quick, stylish, and most importantly be adaptable for lots of bling!

Until I found these charming lighthearted little free designs by Andrea Zuill


I have some tiny bits of lots of goldwork materials sent to me as samples by Benton and Johnson, and some Paillettes and smooth passing left over from other projects.

And I had an Anemone mini-topic from Mulberry Silks and some fabulous silk Duchesse Satin left over from a frocking project, and the colours worked together.

So the lucky recipient will be getting a very luxe ornament indeed. The gold threads are made from real gold, plated over silver, and then hammered out very thin. So are the little god spangles. (They cost 10 p each but they add such shine!)


It is worked in a combination of stem stitch, satin stitch couching, straight stich, (for the feet) Feather stitch (guess) and fly stitch for the little breast feathers.

Finally for extra sparkle I added some beads which I didn't use for the TYger Tyger bag.

I like it. Andrea's folky style is interpreted through my love of bling and luxe materials.

Thursday, 5 November 2009

From the sublime to the ridiculous

First off, the big silk shading embroidery arrived at it's destination and was well recieved.

So I was between projects. (Not quite true, there is a belt with a repeating design I am working on as a surprise for a friend, but she's not expecting it, and I kind of can't face embroidering the same flowers in the same two colourways sequentially).


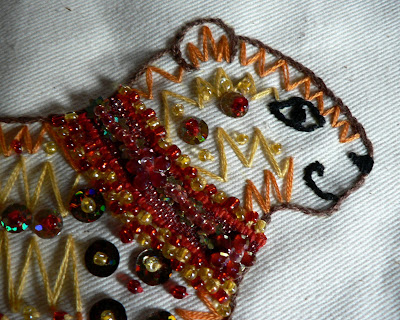
Perfumedwaters (LJ community mostly dedicated to perfume) swappage to the rescue. My swappee loves tigers, apparently so I decided to whip up a quick little beaded tiger design to go on the pocket of a large shopper bag.

Google image search to the rescue, I found a colouring-in page of a stylised Tiger, courtesy of http://www.louiseelliottdesign.net/Download.html which has the cutest animal pictures, which I stylised even more to adapt to embroidery rather than colouring in. I love his little face.

A few beads and some braid from the Big Trim Shop (formerly the Tiny Trim Shop, and it still doesn't have an official name though they are obviously doing well enough to expand) down Walthamstow Market where they have a wall of beads and sequins and another of every trim imaginable (by someone who has really lived and taken substances), and a raid of stash (for the natural cotton drill, and embroidery threads) and I was happily stitching.

I got quite creative with the braid, deconstructing it to add to the variety of beads and trims I had to play with, and layering the flower elements with sequins and beads

I'm rather pleased with him. He took a couple of evenings, and he was fun to do!

I'm less pleased with the workmanship on the bag. My Serger was playing up, and the seams are all bubbly. The top seam was so bad I had to quickly bind it with ribbon (the thing has to go off tomorrow). Apologies for creases, I did iron him, but then I realised I had forgotten to take pics and had to unpack him, snap him and rewrap him.

Sunday, 25 October 2009

The Wedding Present Embroidery is all finished!

I'm sorry I didn't post progress pics, I took them but I was kind of up against it to get it done in time for my brother's wedding.

Probably didn't arrive in time anyway thanks to Royal Fail.

But here it is, the secret obsession that has taken up much of my spare time for the past four months!

Apologies for the wierd colour of the pics, I photographed it in various different lights, and it still doesn't look as pretty as it does in real life.

The real thing is almost A4.

The thing itself


Top detail

bottom detail


The forget-me-nots. They are four differnt colours ranging from cornflower blue to a pale blueish mauve. If you ever look at a spray of forget-me-nots the very top ones are mauve or pink!


The top flower. It's abrighter pink that the bottom flower.


The bottom flower.

The bottom forget me nots


Detail of the leaves. I'm not massively impressed with the way the stems join on to the leave, the satin stitch and the long and short stitch don't seem to meld very well.

Ok, so here is how I mounted it ready for framing.

When I took it off the slate frame it was kind of puckered! So I found some instructions for mounting embroidery. You take acid free foam board and pad it with polyester batting, to give a nice smooth surface and pad out any lumps and bumps. OOOPs, no polyester batting. So I figured that they must have used this method prior to the invention of polyester batting so what would they have used. Fabric? Several layers of? So I chose cotton muslin as the loosest weave fabric I could find, and used about eight layers. I think it worked fine, and I prefer it to polyester batting on general principals.


Then I stretched the embroidery over the padded board using pins.


I kept stretching each side repeatedly until all the puckers were smooth.

Then it was time to lace the emboidery over the frame so the pins could be removed afterwards.


Now I'm wondering what to do next! But I have a frock to finish for consequences and a couple of half finished smaller projects so I sould keep busy.

Saturday, 4 July 2009

Some progress and a dilemma

I atarted with the small blue forget me nots, as I wanted to get into my stride in a simple part of the design. Initially I did the first little leaf in silk shading, but on that tiny a space I thought it looked wrong, with the medium mulberry silk, which is quite thick compared to the 60/2 silk I usually use, so I redid them in Satin stitch. I think the purity of the satin stitch looks nicer, and makes more of the sheen of the silk so I unpicked the first leaf, and re did it in satin stitch.


This is what I had completed by the end of the day. The thicker silk works up much faster! It takes a bit of getting used to, but I like the effect, it's more like a genuine piece, if you look at 18th century embroideries, or pictures of work by May Morris, it is done in very similar looking silk.

And this is what I have completed since. The silk shading looks nicer on the larger leaves, but I still like the contrast of the satin stitch next to it on the small ones. And I love the colours!


Heres one final gratuitous close up of the bottom leaves.


Next time, I might try photographing this outside, as it is really hard to get a good close up without the camera casting a shadow, or the flash only illuminating part of the design.

Anyway, I'm rather pleased with my mulberry silks, though less pleased with my stem stitch!

Saturday, 27 June 2009

Mulberry silks arrived and more investment!

Well, my Mulberry Silks arrived yesterday, beautifully packed and wound and displayed in a lovely palette! And they are indeed yummy. Also, at 30/3 rather thicker than the 60/2 silks I am used to using.

The colours, oh, the colours! And the sheen. It's so easy and lovely to work.

Having said that I have been spoilt by my Handweavers Studio silks, which come in "cheeses" and are sold by weight, at around £80 a kilo. There is a hell of a lot of silk in a kilo! Here is approx £1 worth of Mulberry Silk next to £2 worth of my usual silk.


I'm happy with my Mulberry Silks, and will buy more, because they are not the same thing as my usual silks. They come in every colour imaginable, and are handwound on the spools, they are obviously quality, and they are arranged in palettes and topics, etc by someone who really understands colour. I suspect that that expertise, as much as anything is what you pay for, and rightly so. And these I bought for a special present, because I can't be at my brother's wedding.

But I am also happy to have boxes and boxes of beautiful shiny silk from my local silk shop in quantities that will last me a lifetime, so I can embroider lots of beatiful things for pressies and just for fun, and share them. Not as wonderful as the mulberry silks, but perfectly servicable.

They are moving soon, so today's mission was to pop down to complete my stash, and make sure I wasn't missing any colours. I spent as much as I did on the Mulberry silks and came away with a carrier bag full of silks (approx 20 different colours) two books and a magazine. I now own every colour they do in 60/2 silk, some they no longer do, and a few in other weights. And two of some colours, which I am thinking of sending to Mary Corbet of Needle and Thread, because she likes silks, and she has inspired me lots!

This is my wholestash!


I suspect that when they move they may well become more commercial, with a proper website and sample packs etc. I also suspect the prices may rise, hence my desire to stock up.

Thursday, 25 June 2009

Mulberry Silks, and preparing the design

Monday night I transferred my new embroidery pattern for my brother's wedding pressie using the light box.


Such a difference, from my normal method of transferring frim the computer screen. The transferred design has clean crisp lines because I could press as hard as I liked and tape the fabric firmly to the light box to ensure no distortion. I'm going to love working on it.

Tuesday night I weakened and ordered the Antique Palette from Mulberry Silks for the project. Aren't the colours pretty?


Pat was very helpful, offered to do the Palette I wanted in the thickness I wanted although it is not listed on the website, and explained that if I needed more of any of the colours (the greens spring to mind as there is a LOT of foliage on my design) I can order them individually in any size I like up to 100 metres.

They are based in the Cotswolds, and though they mostly do mail order they may be able to see customers by appointment if the date is convenient. Which is a Good Thing as Esther and I are planning to be in the Cotswolds in October!

There was a choice between Fine and Medium. Medium is about twice the thickness I'm used to working with and Fine about two thirds as fine. I chose Medium, as it takes for ever to embroider a large design in very fine thread, and hopefully it will embroider up quicker. I hope I made the right decision. It is for a piece to go on the wall, and my brother's house is huge, so it will mostly be seen at a distance.

Perhaps I should do a small test piece to see if they suit the technique? I'm reluctant to waste any more time, as it'a a big project, and I need to get cracking, but I would also like to see how they work up. There's some lovely small Dillmont patterns in Broderie en Passe over at the Antique Pattern Library, and the more I think about it the more I think it's probably a good idea.

So last night I framed up the new embroidery piece ready to work on, so hopefully my silks will arrive today. I put it in a slate frame, which is time consuming, but I think is worth it, as it allows you to adjust the tension of the design. I backed the silk with white linen, and sewed the silk to the linen with Herringbone stitch, then sewed and laced the linen to the frame. This stops any pulls in the top layer from the lacing holes. The Herringbone has a little bit of "give" which is why I use it.


So here is the piece, framed and ready to go. If I'm being pernickitty I should probably adjust the lacing a little so it is more even top and bottom, but it's a bit of a pain, as the string was a bit short, and I'm reluctant to re do it entirely with longer length of string. Do you think it will make any difference having that slight "bow" at the top?

Sunday, 21 June 2009

Scrubs up well, doesn't it.


Here is my cleaned up design for the wedding present with grid lines and smudgy bits removed. You don't have to remove the smudgy bits, but I think it makes for an easier image to trace.

FYI, these designs are produced under a creatve commons licence, and came originally from Dillmont, Th. de. Bibliothèque DMC: La Broderie au passé published in 1900. This means you can dowload them and use them and any derivative works, (such as my cleaned up version) but cannot sell them.

I cannot reccommend The Antique Pattern Library http://www.antiquepatternlibrary.org/ where these books are stored highly enough. It is a treasure trove of lost arts, with enough ispiration to inspire a lifetime of crafting!

If I did it again I would probably load the foreground brush with a charcoal grey, the bits where I went over the lines in black stand out more than I would like, but it will do to trace.

Next step printing it out and transferring it to the antique gold silk.

Then framing it up, which I always find a bit boring, though it makes a huge difference to the end result, and I'll be ready to start selecting colours and stitching.

I'm feeling quite a naturalistic colour scheme here, soft pinks, blues and greens.

Thursday, 18 June 2009

Wedding Present Decision made

I have decided what to do for my brothers wedding present, and it's the second asymetric image with the large flower and the spray of smaller ones. It doesn't really lend itself to goldwork, so I shall do it in silk shading, which I enjoy more, although it takes longer. Maybe a light dusting of gold in the centres, a pailette or two? What do you think?

I aim to clean the design up for tracing by using Gimp Shop (Gimp is an open source picture editor, and Gimp shop is an add on to make it behave more like Photoshop, which I am used to but can't afford. Anyone imagining rows of middle aged blokes in rubber suits and masks, shame on you!). Basically I use the brushes, loaded with white to rub out most of the grid lines, (keeping a few to line up with the grain) and then I go over any faint or uneven bits with a pencil brush loaded with black.

Some people use Inkscape, I don't like the look turning images into vectors gives them. I prefer the cleaned up lines of the Victorian original.

I hope to post it today or Sunday.

Wednesday, 17 June 2009

Wedding present design, which to choose?

Now that my shiny new lightbox has arrived, I have NO EXCUSE not to start on my brother's wedding pressie.

It needs to be doable by October, and I've chosen silk shading, though I'm tempted to add a bit of Goldwork.

I've found these three books in Terese Dillmont's Broderie en Passe (which is in the public domain and can be found along with many other stitchin related treasures in the Antique Pattern Library http://www.antiquepatternlibrary.org/completelist.htm and downloaded for free!

Here are the options

I rather like the symmetry of this one


But I think my brother and his new wife might prefer this one.


This one is currently my third preference, though it started as my first.

Monday, 15 June 2009

Pictures of previous projects.

Here are a sample of things I have done over the past couple of years. I usually make things as presents, and draw much of my inspiration for the design from the person it is for.

For example this purse with a tribal raven design in satin stitch on red Dupion was for a friend whose LJ name is Ivymoon Corvus.


While this 18th Century pocket in chain stitch, inspired by an original in the Costume museum in Bath was made for a friend who makes the most wonderful 18th Century inspired frocks, and wears them for Roleplaying in. I used some scrap linen, and my wonderful silks from The Handweaver's Studio in Walthamstow.


When I traced the design, I discovered it was too small for the pocket I wanted to make, so I added various elements to make it bigger. I love the colours, and the slightly wonky feel of the design.

My first attempt at silk ribbon embroidery on a cotton moleskin tea cosy, which was part of a circular swap of tea and teamaking accessories.

Finally, a glimpse of my most ambition project so far, a stomacher from a modified Therese Dillmont design originally intended to be worn with an 18th Century dress for a ball. I didn't complete it in time, and I still need to make it up. This is it partially done, I can't seem to find the photos of it all complete on my new computer.


Anyway, that is a quick cooks tour of my adventures in stitching so far, tomorrow I hope to take and post pics of my current projects.

My silks and shinies

I've been embroidering on and off since I was about 13, (I'm 50 this year) but more fanatically in the last two or three years! I blame Mary Corbett of Needle and thread, who never fails to inspire me. I used to post pics of my creations on my LJ, but all the stitchers seem to have blogs over here, so I thought I'd join you all.

This is just a place holder, (I'm posting from work, my bad) but later in the week there will be pics of some of my past and present projects.

My current projects are;

A first attempt at Jacobean, in Cotton on cream linen twill from a design from a Victorian book on Jacobean work that I found on Project Gutenberg,

A colourful belt in silk shading on black velveteen for a friend,

and, on the to do list, a wall hanging in silk shading (probably from another Dillmont design) as a wedding present for my brother.

Mary talks about how blogging motivates her, I'm hoping it does so for me too, as I really need to get cracking on the last one, the wedding is in October, and they are in New Zealand so I need to allow a couple of weeks for postage.